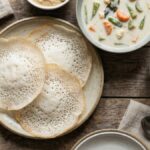
This is the real deal Vada Pav that you get from Mumbai street vendors. Crispy spiced potato fritters tucked inside soft pav with spicy chutneys. I learned this recipe from a friend who grew up in Mumbai, and now I make it whenever I want that exact street food taste at home. The secret is getting that outer coating just right and using the proper spice blend.

What is Vada Pav?
Vada Pav is Mumbai’s most iconic street food. It is a spiced potato dumpling coated in gram flour batter, deep fried until golden, and served inside a soft bread roll called pav. The combination is simple but incredibly satisfying with layers of flavor from the chutneys and fried green chillies.
This vegetarian snack is affordable, filling, and loved across all sections of Mumbai society. You will find it at street stalls, train stations, and even upscale cafes now. The dish became popular in the 1960s and 70s as a quick meal for mill workers and has since become a symbol of Mumbai itself.
About my Authentic Recipe
I have eaten Vada Pav from at least twenty different vendors across Mumbai, and this recipe captures that authentic taste. The key is in the batata (potato) filling where you temper mustard seeds, curry leaves, and green chillies first before mixing with mashed potatoes. Most home versions skip this step and the flavor suffers.
The batter needs to be slightly thick so it coats the vada properly but not so thick that it becomes heavy. I add a tiny pinch of baking soda and some hot oil to the batter which creates that characteristic light, crispy texture with small bubbles on the surface. The garlic chutney is non negotiable and the tamarind chutney balances everything with sweetness.
Why You’ll Love This Recipe
You get restaurant quality Vada Pav at home for a fraction of the cost. The recipe is straightforward with common ingredients and the results taste just like what you would buy from a good Mumbai stall. These vadas stay crispy for a good 15 to 20 minutes and reheat well too. Perfect for evening snacks, weekend brunches, or when you have guests over and want to serve something different.
Ingredients & Substitutes
Potatoes – Use starchy potatoes like Russet or regular Indian potatoes. Waxy potatoes will not mash as smoothly and can make the filling gluey.
Besan (gram flour) – This is essential for the batter. Chickpea flour is the same thing. Do not substitute with all purpose flour or rice flour as the taste will be completely different.
Pav – These are soft dinner rolls. You can use burger buns or Portuguese rolls if pav is not available but the texture will be slightly different.
Garlic chutney – Fresh garlic, red chilli powder, and salt ground together. Store bought will not give the same punch.
Green chutney – Made with coriander, mint, green chillies, and lemon juice. You can use any green chutney you like.
Variations
Cheese Vada Pav – Add a small cube of processed cheese inside the potato ball before coating and frying.
Schezwan Vada Pav – Replace garlic chutney with Schezwan sauce for a Chinese fusion version.
Baked Version – Shape the vadas, brush with oil, and bake at 200°C for 25 to 30 minutes, flipping once. The texture will be different but healthier.
Jain Vada Pav – Skip onions, garlic, and ginger. Use rock salt and asafoetida for flavor.
Stuffed Vada Pav – Add crumbled paneer or boiled peas to the potato mixture for extra protein.
Expert tips for Vada Pav
Dry out the potatoes – After boiling and peeling, let potatoes sit for 5 minutes so excess moisture evaporates. Wet filling makes the coating slide off during frying.
Test the batter – Drop a small amount into hot oil. It should sizzle and rise immediately. If it sinks, the oil is not hot enough.
Fry on medium to high heat – Too low and the vadas absorb oil. Too high and they brown outside but stay raw inside.
Shape uniform balls – Make all vadas the same size so they cook evenly. About the size of a lime works best.
Toast the pav lightly – This prevents them from getting soggy when you add chutneys. Use a tawa or flat pan with a tiny bit of butter.
Serve immediately – Vada Pav tastes best fresh when the vada is still crispy and the pav is warm.
Double coat if needed – If your batter is too thin, dip the vada once, let it sit for 30 seconds, then dip again before frying.
Save leftover vadas – They keep in the fridge for 2 days. Reheat in an air fryer or oven to restore crispiness.

Mumbai’s Famous Vada Pav Recipe – Authentic Street Style
Ingredients
For the Potato Filling (Batata)
- 4 medium potatoes boiled, peeled, and mashed
- 2 tbsp oil
- 1 tsp mustard seeds
- ½ tsp cumin seeds
- 8-10 curry leaves
- 2-3 green chillies finely chopped
- ½ tsp turmeric powder
- 1 tsp salt or to taste
- 1 tbsp chopped coriander leaves
- 1 tsp lemon juice
For the Batter
- 1 cup besan gram flour
- ¼ tsp turmeric powder
- ¼ tsp red chilli powder
- ½ tsp salt
- 1 pinch baking soda
- ¾ cup water approximately
- 1 tbsp hot oil
- 6 pav dinner rolls
Instructions
Prepare the Potato Filling
- Boil potatoes until completely cooked. Peel and mash them while still warm. Set aside and let them cool slightly.
- Heat 2 tablespoons oil in a kadhai or pan over medium heat. Add mustard seeds and let them crackle.
- Add cumin seeds, curry leaves, and chopped green chillies. Saute for 10to15 seconds until fragrant.
- Add turmeric powder and immediately add the mashed potatoes. Mix everything well so the spices coat the potatoes evenly.
- Add salt, coriander leaves, and lemon juice. Mix well and cook for 2 minutes on low heat. Turn off the heat and let the mixture cool completely.
- Once cooled, divide the potato mixture into 6 equal portions and shape them into smooth round balls. Keep them covered.
Make the Batter
- In a mixing bowl, add besan, turmeric powder, red chilli powder, salt, and baking soda. Mix the dry ingredients well.
- Add water gradually and whisk to make a smooth batter with no lumps. The consistency should be thick enough to coat the back of a spoon but still flowing.
- Add 1 tablespoon of hot oil to the batter and mix well. This makes the coating crispy. Let the batter rest for 5 minutes.
Fry the Vadas
- Heat oil for deep frying in a kadhai or deep pan. The oil should be medium hot, about 180°C. Test by dropping a small amount of batter. It should sizzle and rise slowly.
- Take one potato ball, dip it completely in the batter so it is coated evenly from all sides, and gently slide it into the hot oil.
- Fry 2to3 vadas at a time without overcrowding. Fry on medium to high heat, turning occasionally, until the vadas are golden brown and crispy all over. This takes about 4to5 minutes per batch.
- Remove the vadas with a slotted spoon and drain on paper towels. Keep them warm.
- In the same oil, fry the whole green chillies for 30to40 seconds until they blister. Remove and drain.
Assemble the Vada Pav
- Slice each pav horizontally but do not cut all the way through. Keep one side attached like a hinge.
- Spread garlic chutney on one side of the pav and green chutney on the other side. Add a drizzle of tamarind chutney if using.
- Place one hot vada inside the pav and press gently. Serve immediately with fried green chillies and peanuts on the side.
Notes
Common Issues & Solutions
Vada coating slides off during frying – The potato filling was too wet or oily. Make sure potatoes are completely dry and cooled. Also check that your batter is thick enough to cling properly.
Batter is too thick and coating is heavy – Add water one tablespoon at a time and whisk until you get a flowing but coating consistency. The batter should drip slowly from a spoon.
Vadas absorb too much oil – Oil temperature was too low. Increase the heat slightly and wait until oil is properly hot before adding the next batch. Also avoid overcrowding the pan.
Potato filling is bland – You likely did not add enough salt or the tempering was rushed. Always taste the filling before shaping and adjust salt. Let the tempering ingredients cook properly so they release their flavors.
Vadas are brown outside but raw inside – Oil was too hot. Reduce heat to medium and fry slower so the inside cooks through while the outside browns evenly.
Pav gets soggy quickly – Toast the pav lightly on a tawa before assembling and do not add too much chutney. Serve immediately after assembling.
Serving and Storage Suggestions
Serve Vada Pav hot as an evening snack or breakfast. It pairs perfectly with masala chai or filter coffee. The traditional Mumbai style is to serve with fried green chillies and dry garlic chutney on the side. Some vendors also add a handful of fried salted peanuts for crunch.
You can serve this at parties as finger food or pack it for picnics and lunch boxes. The vadas travel well if kept separate from the pav until eating time. Store vadas and pav separately in airtight containers. Vadas stay fresh for 2 days in the fridge and up to a month in the freezer. Reheat frozen vadas in an oven or air fryer without thawing.
Your Question My Answer
Q1: Can I make Vada Pav without deep frying?
Ans: Yes, you can shallow fry the vadas with less oil by flattening them slightly into patties, or bake them at 200°C for 25 to 30 minutes, flipping halfway. The texture will be different but still tasty.
Q2: What can I use instead of pav?
Ans: Use burger buns, dinner rolls, or any soft bread rolls. Slightly sweet Hawaiian rolls work surprisingly well. Avoid crusty breads as they are too hard for this dish.
Q3: How do I make the coating extra crispy?
Ans: Add 2 tablespoons rice flour or cornflour to the besan batter. Also make sure to add hot oil to the batter and fry at the correct temperature.
Q4: Can I prepare Vada Pav in advance?
Ans: You can make the potato filling and garlic chutney a day ahead. Fry the vadas fresh for best results, or fry them 2 to 3 hours before serving and reheat in an oven.
Q5: Is Vada Pav gluten free?
Ans: The potato vada is naturally gluten free as it uses gram flour. However, regular pav contains gluten. Use gluten free bread rolls to make the entire dish gluten free.